Subnetting
Analysis
Introduction
So we have covered to some depth the subnetting
topic, but there is still much to learn ! We are
going to explain here the available subnet masks and
analyse a Class C network, using a specific subnet
mask. It's all pretty simple, as long as you
understand the logic behind it.
Understanding the use, and analysing different
subnet masks
Okay, so we know what a subnet mask is, but we
haven't spoken (yet) about the different values they
take, and the guidelines we need when we use them.
That's what we are going to do here !
The truth is that you cannot take any subnet mask
you like and apply it to a computer or any other
device, because depending on the random subnet mask
you choose, it will either create a lot of routing
and communication problems, or it won't be accepted
at all by the device you're trying to configure.
For this reason we are going to have a look at the
various subnet masks so you know exactly what you
need to use, and how to use it. Most important, we
are going to make sure we understand WHY you need to
choose specific subnet masks, depending on your
needs. Most people simply use a standard subnet mask
without understanding what that does. This is not
the case for the visitors to this site.
Let's first have a look at the most common subnet
masks and then I'll show you where these numbers
come from :)
Common
Subnet Masks
In order to keep this place tidy, we are going to
see the common Subnet masks for each Class. Looking
at each Class's subnet mask is possibly the best and
easiest way to learn them.
|
Numer of
bits
|
Class A
|
Class B
|
Class C
|
|
0
(default mask)
|
255.0.0.0
(default_mask)
|
255.255.0.0
(default_mask)
|
255.255.255.0
(default_mask)
|
|
1
|
255.128.0.0
(default +1)
|
255.255.128.0
(default+1)
|
255.255.255.128
(default+1)
|
|
2
|
255.192.0.0
(default+2)
|
255.255.192.0
(default+2)
|
255.255.255.192
(default+2)
|
|
3
|
255.224.0.0
(default+3)
|
255.255.224.0
(default+3)
|
255.255.255.224
(default+3)
|
|
4
|
255.240.0.0
(default+4)
|
255.255.240.0
(default+4)
|
255.255.255.240
(default+4)
|
|
5
|
255.248.0.0
(default+5)
|
255.255.248.0
(default+5)
|
255.255.255.248
(default+5)
|
|
6
|
255.252.0.0
(default+6)
|
255.255.252.0
(default+6)
|
255.255.255.252
(default+6)
|
|
7
|
255.254.0.0
(default+7)
|
255.255.254.0
(default+7)
|
255.255.255.254
(default+7)
* Only 1 Host per subnet
|
|
8
|
255.255.0.0
(default+8)
|
255.255.255.0
(default+8)
|
255.255.255.255
(default+8)
* Reserved for Broadcasts
|
The above table might seem confusing at first, but
don't despair ! It's simple, really, you just need
to look at it in a different way !
The
trick to understanding the pattern of the above
table is to think of it in the following way: Each
Class has its
default subnet mask,
which I have noted using the
Green
colour, and all we are doing
is borrowing a Bit at a time (starting from
1,
all the way to 8)
from the Host ID portion of each class. I have used
various
colours
to show you the decimal
numbers that we get each time we borrow a bit from
the Host ID portion. If you can't understand how
these decimal numbers work out, then you should read
up on the
Binary & IP page.
Each time we borrow a bit from
the Host ID, we split the network into a different
number of networks. For example, when we borrowed
3 Bits
in the Class C network, we
ended up partitioning the network into 8 smaller
networks. Let's take a look at a detailed example
(which we will break into three parts) so we can
fully understand all the above.
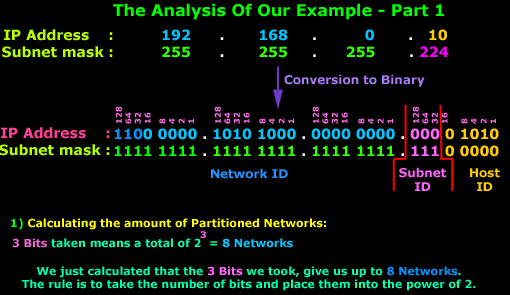
We are going to do an analysis
using the Class C network and
3 Bits
which we took from the Host
ID. The analysis will take place once we convert our
decimal numbers to binary, something that's
essential for this type of work. We will see how we
get 8 networks from such a configuration and their
ranges !

In this first part, we can see
clearly where the 8
Networks come from. The
rule applies to all types of Subnets, no matter what
Class they are. Simply take the
Subnet Bits
and place them into the power of 2 and you get your
Networks.
Now, that was the easy part. The second part is
slightly more complicated and I need you focused so
you don't get mixed up!
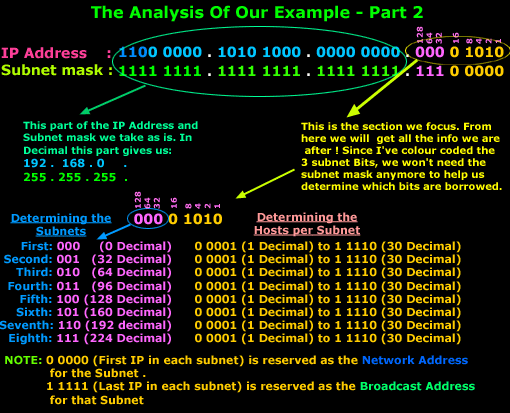
At first the diagram below seems quite complex, so
try to follow me as we go through it:

The IP Address and Subnet mask is show in Binary
format. We focus on the last octec which contains
all the information we are after. Now, the last
octec has 2 parts, the Subnet ID and Host ID. When
we want to calculate the Subnets and Hosts, we deal
with them one at a time. Once that's done, we put
the Subnet ID and Host ID portion together so we can
get the last octec's decimal number.
We know we have
8 networks
(or subnets)
and, by simply counting or incrementing our binary
value by one each time, we get to see all the
networks available. So we start off with
000
and finish at
111.
On the right hand side I have also put the
equivalent decimal number for each network.
Next we take the Host ID
portion, where the first available host is
0 0001 (1
in Decimal),
because the 0 0000
(0
in Decimal) value is reserved as it is the Network
Address (see
IP
Classes page), and the
last value which is 1
1111 (31
in decimal) is used as a
Broadcast Address for each Subnet (see
Broadcast
page).
Note
I've given a formula in the
IP
Classes page that allows
you to calculate the available hosts, that's exactly
what we are doing here for each subnet. This formula
is :2 to the power of
X -2.
Where
X
is the number of Bits we have in the
Host ID
field, which for our example
is 5.
When we apply this formula, we
get 2 to the power of 5 - 2 = 30 Valid (usable) IP
Addresess. If you're wondering why we subtract 2,
it's because one is used for the
Network Address
of that subnet and the other
for the Broadcast
Address of that subnet.
This shouldn't be new news to anyone :)
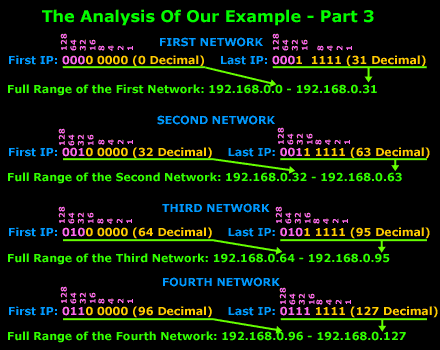
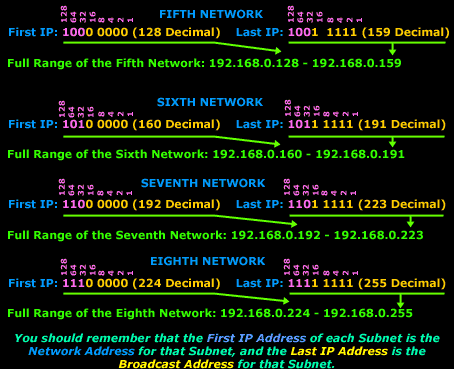
Summing up, these are the ranges for each subnet in
our new network:


I hope the example didn't confuse you too much; the
above example is one of the simplest type, which is
why I chose a Class C network, they are the easiest
to work with.
If you did find it somewhat difficult, try to read
over it slowly. After a few times, you will get to
understand it. These things do need time to sink in
!
|
