Static Network
Address Translation (Part 1)
Introduction
Static NAT
(also called inbound mapping)
is the first mode we're going to talk about and also
happens to be the most uncommon between smaller
networks.
Static NAT
was mainly created to allow
hosts on your private network to be direcly
accessible via the Internet using real public IPs;
we'll see in great detail how this works and is
maintained. Static NAT
is also considered a bit
dangerous because a misconfiguration to your
firewall or other NAT-enabled device can result in
the full exposure of the machine on your private
network to which the public IP Address maps, and
we'll see the security risks later on this page.
What exactly does Static NAT do ?
As mentioned in the
introduction, Static
NAT allows the mapping
of public IP Addresses to hosts inside the internal
network. In simple english, this means you can have
a computer on your private network that exists on
the Internet with its own real IP.
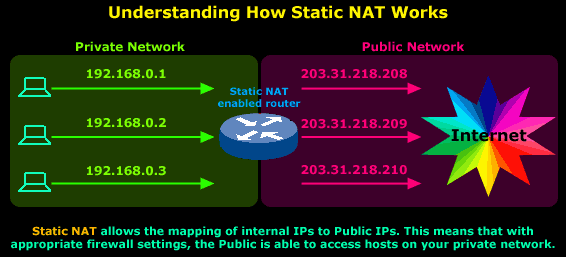
The diagram below has been
designed to help you understand exactly how
Static NAT
works:

In this diagram you can see
that we have our private network connected to the
Internet via our router, which has been configured
for Static NAT
mode. In this mode each
private host has a single public IP Address mapped
to it, e.g private host
192.168.0.1 has the
public IP Address
203.31.218.208 mapped
to it. Therefore any packets generated by
192.168.0.1
that need to be routed to the
Internet will have their source IP field replaced
with IP Address
203.31.218.208.
All IP translations take place within the router's
memory and the whole process is totally transparent
to both internal and external hosts. When hosts from
the Internet try to contact the internal hosts,
their packets will either be dropped or forwarded to
the internal hosts depending on the router's &
firewall configuration.
But where would Static NAT be used?
Everyone's needs are different
and with this in mind
Static NAT could be the
solution for many companies that require a host on
their internal network to be visible and accessible
from the Internet.
Let's take a close look at a
few examples of places where
Static NAT
could be used.
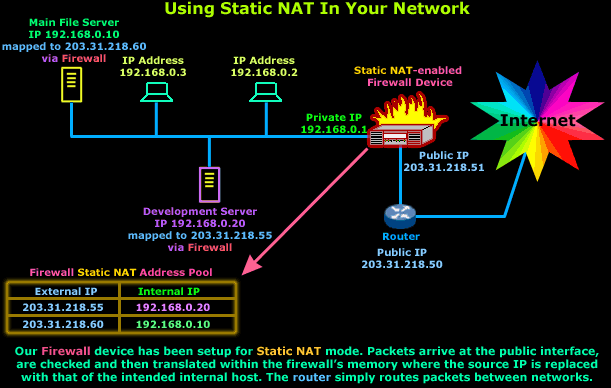
Implementation of Static NAT - Example 1
We have a development server (192.168.0.20)
that needs to be secure, but also allow certain
customers to gain access to various services it
offers for development purposes. At the same time,
we need to give the customers access to a special
database located on our main file server (192.168.0.10):

In this case,
Static NAT,
with a set of complex filters
to make sure only authorised IP Addresses get
through, would do the job just fine.
Also, if you wanted a similar setup for the purpose
of using only one service, e.g http, then you're
better off using a different NAT mode simply because
it offers better security and is more restrictive.
Let me remind you that
Static NAT
requires one public IP Address
for each mapping to a private IP Address. This means
that you're not able to map a public IP Address to
more than one private IP Address.
Implementation of Static NAT - Example 2
Another good example of using
Static NAT
is in a
DMZ zone. The
principle of having a
DMZ zone is when you
require certain machines e.g webservers, email
servers, to be directly accessible to the Internet
but at the same time, should these machines be
compromised, all data can be restored without much
trouble and they won't expose the internal private
network to the Internet.

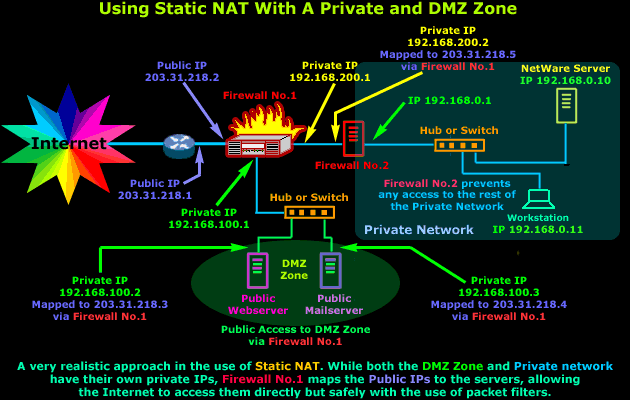
The diagram above might seem
very complex, but it's actually extremely simple.
Breaking it down will help you see how simple it is.
If we focus on Firewall
No.1 we see that it's
connected to 3 networks, first one is the
Internet
(203.31.218.X),
second one the
DMZ (192.168.100.X)
and the third is the small private network between
our two Firewalls (192.168.200.X)
Firewall No.1
is configured to use
Static NAT
for 3 different hosts - that's two from the
DMZ zone
and one for Firewall
No.2. Each interface of
the Firewall must be part of a different network in
order to route traffic between them. This explains
why we have so many different IP Addresses in the
diagram, resulting in the complex appearance.
With this setup in mind, the
Static NAT
table of
Firewall No.1 would
look like this:
|
Firewall No.1
Static NAT Table
|
|
External Public IP Address
|
Mapped to
Internal Private IP Address
|
|
203.31.218.2
|
Firewall No.1 Public Interface
|
|
203.31.218.3
|
192.168.100.2 - Public WebServer in DMZ
|
|
203.31.218.4
|
192.168.100.3 - Public MailServer in DMZ
|
|
203.31.218.5
|
192.168.200.2 - Firewall No.2 of Private
Net.
|
As you can see, this table is
a good summary of what is happening in the diagram
above. Each external IP Address is mapped to an
internal private IP Address and if we want to
restrict access to particular hosts then we can
simply put an access policy (packet filters) on
Firewall No.1.
This type of firewall setup is
actually one of my favourites :) |
