IP Subnetting -
The Basic Concepts
Introduction
Introduction ? We already did that in the previous
page :)
Let's get stuck right into this cool topic !
What is Subnetting ?
When we
Subnet a network, we basically
split it into smaller networks.
For example, when a set of IP
Addresses is given to a company, e.g 254 they might
want to "break" (the correct term is "partition")
that one network into smaller ones, one for each
department. This way, their Technical department and
Management department can each have a small network
of their own. By subnetting the network we can
partition it to as many smaller networks as we need
and this also helps reduce traffic and hides the
complexity of the network.
By default, all type of
Classes (A,
B
and C)
have a subnet mask, we call it the "Default
Subnet mask". You need
to have one because:
1) All computers need the subnet mask field filled
when configuring IP
2) You need to set some logical boundaries in your
network
3) You should at least enter the default subnet mask
for the Class you're using
In the previous pages I spoke
about IP Classes, Network IDs and Host IDs, the fact
is that the Subnet mask
is what determines the
Network ID
and
Host ID
portion of an IP Address.
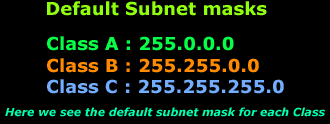
The table below shows clearly the subnetmask that
applies for each network Class.

When dealing with
subnet masks
in the real world, we are free in most cases to use
any type of subnet mask
in order to meet our needs. If
for example we require one network which can contain
up to 254
computers, then a
Class C network
with its
default subnet mask
will do fine, but if we need
more, then we might consider a
Class B network
with its
default subnet mask.
Note that the default subnet masks have been set by
the IEEE committee, the same guys that set and
approve the different standards and protocols.
We will have a closer look at this later on and see
how we can achieve a Class C network with more than
254 hosts.
Understanding the concept
Let's stop here for one moment and have a look at
what I mean by partitioning one network into smaller
ones by using different
subnet masks.
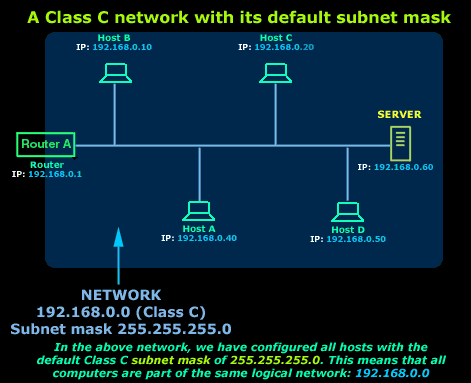
The picture below shows our
example network (192.168.0.0).
All computers here have been configured with the
default
Class C
subnet mask
(255.255.255.0):

Because of the subnet mask we used, all these
computers are part of the one network marked in
blue. This also means that any one of these hosts
(computers, router and server) can communicate with
each other.
If we now wanted to partition
this network into smaller segments, then we would
need to change the
subnet mask
appropriately so we can get the desired result.
Let's say we needed to change the subnet mask from
255.255.255.0
to
255.255.255.224
on each configured host.
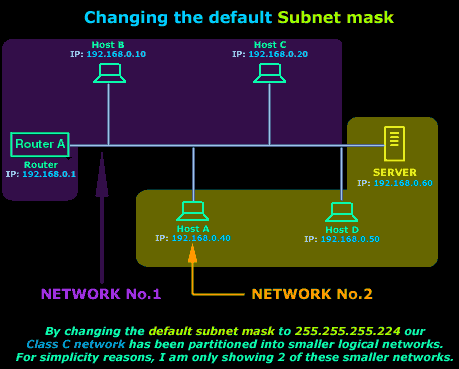
The picture below shows us how the computers will
see the network once the subnet mask has changed:

In reality, we have just created 8 networks from the
one large (blue) network we had, but I am keeping
things simple for now and showing only 2 of these
smaller networks because I want you to understand
the concept of subnetting and see how important the
subnet mask is.
In the next pages which are to follow I will analyse
in great depth the way subnetting works and how to
calculate it. It is very important that you
understand the concepts introduced in this section,
so make sure you do, before continuing !
|
